|
If your Cocoa application needs to communicate with
Ontrak Control Systems’ ADU I/O devices, you can do it
quick & easy! No need to navigate Apple’s HID Manager:
I’ve built a user-space driver for ADU I/O devices that
takes care of the details for you! Read on & follow the
tutorial to learn how to create a simple read / write
application for ADU devices.
Unlike a keyboard or joystick, ADU devices don’t return
a constant stream of data. Rather, ADU devices are
command based. Some commands simply perform an action on
the ADU, while others request a response. For this
tutorial. we’ll be building a simple app that allows the
user to specify and send a command to the ADU, and also
read its response.
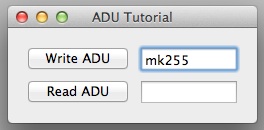
The finished app will look like this - simple & easy!
Text entered in the upper text box can be written to the
ADU as a command by clicking Write ADU (or pressing
return.) Clicking Read ADU will fill the lower text box
with the ADU’s most recent input data.
Before you get started, download the current version of
the ADU driver:
ADU Driver
v0.4.zip
Extract the ADUDriver.c & ADUDriver.h files form the
archive you just downloaded. You’ll need these later.
Launch Xcode (I’m using 4.4.1 on OSX 10.8 for this
tutorial) and create a new project.
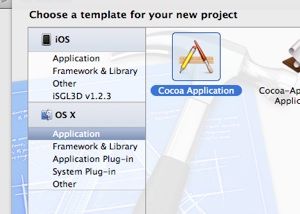
Choose OS X, Application then Cocoa Application before
clicking Next.
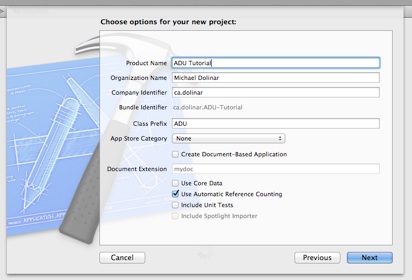
Let’s name our product ADU Tutorial. While we’re at it,
a class prefix of ADU makes sense. Then click Next.
Xcode will need you to tell it where to save your new
project - I saved mine in my Documents folder.

You’ll need the IO kit framework for this project
(and for all projects that use the ADU driver.) Click
the + below the Linked Frameworks and Libraries section,
select & add the IOKit.framework item (if you’re having
difficulty finding the IOKit.framework item, enter IOKit
in the search box.)

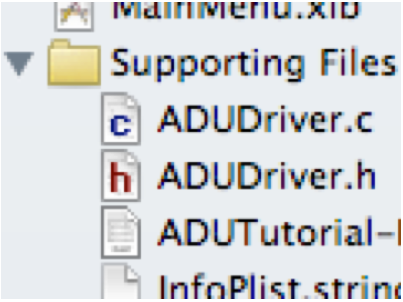
Add the ADUDriver files you downloaded earlier. You can
do this by dragging them into the Supporting Files
folder of your project.
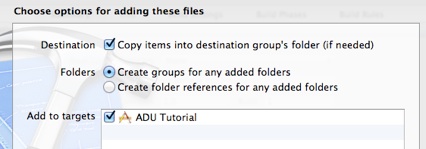
Make sure to check the Add to targets box next to ADU
Tutorial. Also, check the box labeled Copy items into
destination group’s folder (if needed).
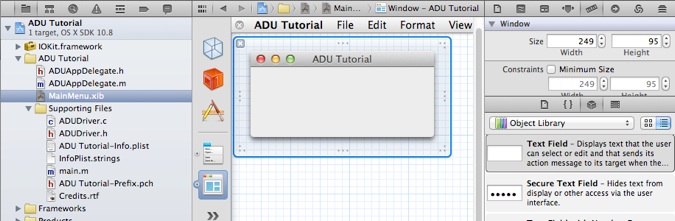
Click on the file MainMenu.xib, which will bring up the
Interface Builder. Select your application’s window
(Window - ADU Tutorial) and resize it to 249 x 95.

Create a Push Button in the top left corner of the
window. Stretch it out to a width of 100. Title this one
Write ADU.
Now make a second one titled Read ADU (you can do this
quickly by copying & pasting the first button, then
changing its title.)
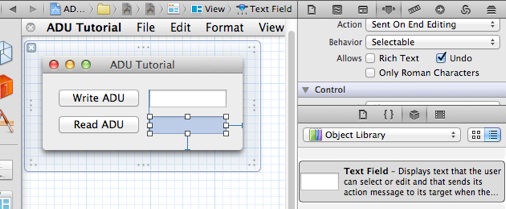
Add two Text Fields to the window. The default Text
Field size will do just fine.
The upper text field, next to the Write ADU button will
allow the user to enter commands. The default Text Field
attributes are fine for this field.
The lower text field will be used to display the
response from the ADU and should not be user-editable.
Select this text field, locate the Behavior attribute
and change the value from Editable to Selectable. This
will allow the user to select & copy the contents of the
text field, but not modify it.
At this point, we need to create some links between our
interface and our code. Click on the ADUAppDelegate.h
file and add a pointer to each text field.
@interface ADUAppDelegate : NSObject
<NSApplicationDelegate> {
IBOutlet NSTextField*
writeField; // text field next to the 'Write ADU'
button
IBOutlet NSTextField*
readField; // text field next to the 'Read ADU'
button
}
Your ADUAppDelegate declarations should look like
this.
While editing the ADUAppDelegate.h file, add
declarations for Interface Builder Actions (IBAction) to
be called when the Write ADU and Read ADU buttons are
pressed.
#import <Cocoa/Cocoa.h>
@interface ADUAppDelegate : NSObject
<NSApplicationDelegate> {
IBOutlet NSTextField*
writeField; // text field next to the 'Write ADU'
button
IBOutlet NSTextField*
readField; // text field next to the 'Read ADU'
button
}
@property (assign)
IBOutlet
NSWindow *window;
-(IBAction)WriteADU:(id)sender;
-(IBAction)ReadADU:(id)sender;
@end
Your ADUAppDelegate.h file should look like this.
With the Interface Builder Outlets and Interface Builder
Actions declared, we can go back to the Interface
Builder and wire these up!
To bring up the Interface Builder, click on the
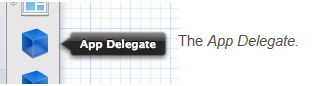
MainMenu.xib file. You need to locate the App Delegate.
It’s represented by a blue cube, when you hover your
mouse over the cube, a label reading App Delegate will
appear.
Hold the control key on your keyboard while clicking &
dragging from the App Delegate to the upper text field
in the ADU Tutorial window.
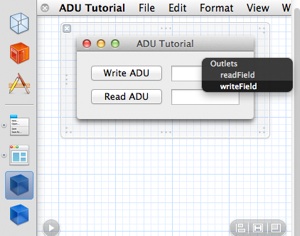
The Outlets window appears. Select the writeField outlet
for the upper text field. Repeat, wiring the lower text
field to the readField outlet.
To wire the buttons to their actions, we
control-click-drag from the button to the App Delegate.
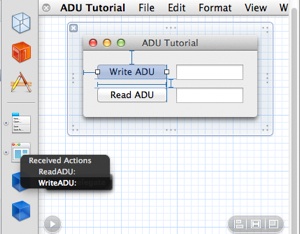
At this point, it should be obvious that we wire the
Write ADU button to the WriteADU action. Repeat, wiring
the Read ADU button to the ReadADU action.
For bonus points, control-click-drag from the upper text
field to the App Delegate and wire it also to the
WriteADU action. This will allow our users to send a
command by simply pressing the enter key from within the
text field, instead of having to click the Write ADU
button.
To verify your connections, select the App Delegate,
then click on the Connections Inspector.
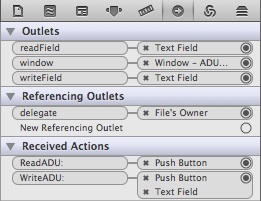
Verify Connections Inspector for the App Delegate looks
like this.
UI? Check. Declarations? Check. Connections? Check. Now
it’s time to write some code!
Click on the ADUAppDelegate.m to open the implementation
file in the editor. Near the top of the file (just below
the existing #import statement), be sure to include the
ADUDriver.h header file.
#import "ADUAppDelegate.h"
#include "ADUDriver.h"
The ADU driver functions are now
accessible from within the ADUAppDelegate.m file.
Locate the applicationDidFinishLaunching method.
Initialize the ADU driver here by simply calling
ADUInit:
- (void)applicationDidFinishLaunching:(NSNotification
*)aNotification
{
//
Insert code here to initialize your application
ADUInit();
}
ADUInit returns a boolean
representing the success of the call. In a production
environment, be sure to check the returned value and
respond appropriately if it is FALSE.
Implement the WriteADU action. This is the code that
will be called when the user clicks the Write ADU button
(or presses enter from within the upper text field.)
Here, we’ll declare a command buffer, assign it the
contents of the upper text field, then call ADUWrite to
send the command:
-(IBAction)WriteADU:(id)sender{
char* command = (char*)
[[writeField
stringValue]
UTF8String];
ADUWrite(1,
command, NULL);
}
ADUWrite takes three parameters.
The first specifies the ADU pipe to write. ADU devices
accept commands on pipe 1 (see the Ontrak documentation
for more info on other pipes.) The second parameter is a
pointer to the character array containing the command.
The third parameter is a pointer to the character array
containing the serial number of the specific ADU device
we’re writing. If NULL is specified for the third
parameter, the command will be sent to the first
detected ADU device (useful in applications where only a
single ADU is present.)
Just as ADUInit() returns success, ADUWrite() also
returns success as a boolean value.
Implement the ReadADU action. This is the code that will
be called when the user clicks the Read ADU button. It
will retrieve a pointer to the current ADU input buffer
using ADURead, validate its contents, then display the
contents in the lower text field:
-(IBAction)ReadADU:(id)sender{
char* inputReport =
ADURead(1,
NULL);
if(!inputReport) inputReport="";
[readField
setStringValue:[NSString
stringWithCString:inputReport
encoding:NSUTF8StringEncoding]];
}
ADURead takes two parameters. The
first is the pipe number we’re reading - all ADU input
reports come in on pipe 1. The second is a pointer to
the serial number of a specific ADU to read. As ADUWrite
accepts NULL as the serial number parameter, ADURead
does also. Specifying NULL will read from the first
detected ADU device.
ADURead returns a pointer to the input buffer for the
specified ADU device. Note that if there are no ADU
devices connected, or if the specified serial number was
not found, ADURead returns NULL. Thus the second line of
code, validating that inputReport is not NULL before
applying it to the lower text field.
At this point, the ADUAppDelegate.m file looks like
this:
#import "ADUAppDelegate.h"
#include "ADUDriver.h"
@implementation ADUAppDelegate
- (void)applicationDidFinishLaunching:(NSNotification
*)aNotification
{
//
Insert code here to initialize your application
ADUInit();
}
-(IBAction)WriteADU:(id)sender{
char* command = (char*)
[[writeField
stringValue]
UTF8String];
ADUWrite(1,
command, NULL);
}
-(IBAction)ReadADU:(id)sender{
char* inputReport =
ADURead(1,
NULL);
if(!inputReport) inputReport="";
[readField
setStringValue:[NSString
stringWithCString:inputReport
encoding:NSUTF8StringEncoding]];
}
@end
Go ahead, click Run and see your
work in action!
Don’t know what commands to send? Try “MK3” to close the
first two relays. Then “PK” to request the state of the
relays. Likewise, “PA” requests the state of input port
A. Check out the ADU Command Reference for more!
Download the Xcode 4 project file
ADU Tutorial.zip
Keep your eyes on the Apple App Store for a special (and
free) version of the ADU Tutorial, complete with
multiple ADU support & automatic device reading!
Back to Programming Page |